Thursday, September 30, 2010

Making over a Wipe Box

I made this about 5 months ago and saw the pictures on my computer and remembered I never shared this project. (I think I never shared because I didn't like the pictures I took. :))

I actually saw the original idea on Marah Johnson's facebook (I love her work!!) and decided that Ellie's nursery needed one of these. Or should I say extremely fancy storage room, the girl never uses that room!


Makes a boring looking necessity into a super fun accessory! Plus, if you have the stuff laying around, it won't cost you anything to do!

Wednesday, September 29, 2010

Kimono and Pants Set

I have to share this outfit I made today:


I requested this free pattern from habitual and it went so fast. She was so sweet and it was emailed really fast too!

I cheated and didn't make my own bias tape (although I started to. I just wanted to cheat since I had some that matched already. I am all about short cuts.)


I thought it would look really dressy to add some silky looking pants with matching trim to make it a complete outfit and traced some sweat pants that we already had here. The fabric was an old tablecloth!


Love the completed look!


I bet it would be a great boy outfit too. Thanks again for sharing that great pattern, Habitual!


Friday, September 24, 2010

Glitter Bond

Hey there!

Meet my new friend, Glitter Bond. An inexpensive way to add some sparkle to fabric!


For this project, I used a onesie I had previously dyed, glitter bond, martha stewart glitter, and lace.

I used the freezer paper technique for the glitter bond. I cut out the stencil on freezer paper, ironed on, and then applied the glitter bond generously with a sponge onto one of the images. IMMEDIATELY after (because it seems to dry fast), I sprinkled the glitter on and then shook excess off. I repeated the process with the second color.


For the lace, I just made sure to pin it all on so that it sewed nice and straight. I pleated the ruffle collar so that it wouldn't bend up into her face. I thought the lace looked like a fancy little tablecloth.


Easy enough, right? It's so satisfying to see all that shimmer! :) 

Thursday, September 23, 2010

Ruffle Leg Onesie with Butterfly Wings

Awhile back, my sister in law showed me these ruffle leg onesies. I thought they were pretty cute, and finally got around to making them when I saw the tutorial here

Then I saw this tutorial on how to add butterfly wings, and decided to combine the two:
  

Super fast and simple, and I love the results. I think I will add some baby legs to protect her little knees though :)

Saturday, September 18, 2010

Pettiskirt and frilly stuff!

I absolutely adore pettiskirts and frilliness. I think they are really fun and feminine, but to buy the super full ones are also kind of pricey. I found out exactly why over the last month! They are tedious and a bit time consuming.

I watched this link, read this blog and then also this blog.

The only reason why I hadn't made it earlier was because you have to have no-fray chiffon. No one local (that I know of) sells no-fray chiffon, so I ended up ordering it here. I already had the blue no-fray chiffon magically in my stash (my mother in law finds the coolest stuff at yard sales) and I already had the yellow ribbon for another project and the yellow satin from a previous project, so it made sense to put it together. All I had to purchase was the no-fray chiffon in yellow. (A tip: The first time I put an order in, I only ordered 60 yard, thinking that would be more than enough. Wrong! I ended up having to put in a second order, and for like a dollar something more, I bought the 90 yards and have tons to spare.)

I used my gathering foot NOT the ruffler foot for this project. The reason why, is because the chiffon is so thin and delicate, the ruffler foot was just making it all a mess.

I started out hand gathering and did the blue this way. WHAT A PAIN! It seriously took me way longer than I think really it should have been. Then when I got the gathering foot, the yellow took no time at all.

Also, when you make it, if you are doing it for a baby or small child, make it larger than necessary. Ours will last a lot longer because I can pin it in the back for pictures. It's a lot of work and I would have been sad if she had outgrown it soon!


After I finished the skirt, I embellished a onesie

did a hair clip:

and made shoes from a mary jane pattern I had gotten on Etsy a long time ago:


I am so excited to get some good pictures of her when she turns 9 months at the end of the month (whoa!)

Hopefully if you decide to do one as well, something here will help you in the process! :) Enjoy!

Monday, September 13, 2010

Thread Holder

My name is Rebecca, and I am addicted to thread. and ribbon. and embroidery thread. and buttons. and fabric....

Ok, I like a lot of stuff.

Anyway, I have a lot of thread but its kept in a rubbermaid, way up high on top of my cabinets. It is a jumbled mess in that box and it is driving me insane.

This thread holder is definitely just what I needed to help with this! It has about half my thread on it, so if i keep the colors I need the most available, then it eliminates all that climbing up and down and knotted messes!

My husband built it for me and used quarter dowels, drilled holes to fit them in some scrapwood he had, and the whole project cost 6 dollars. Now all I need to do is paint it and put the thread on it the best way for me!


Friday, September 3, 2010

Kitchen door words of wisdom

Taken with my camera phone.

I love that when you leave, its the last thing you see!

(PS, Galatians is spelled wrong in the picture. I fixed it :) and I also felt pretty dumb when my husband pointed it out. haha)

Wednesday, September 1, 2010

Boys' new room

When Jackson moved in with Jaden, we never really made the room feel like it was for both of them. We basically put a mattress under Jaden’s bed and called it good.

Well, like it or not,our boys are growing. And as they are growing, we realized they need more space in there too.

It was time to redo their room, and we focused on two things. 1. making the room feel like it was for both of them. and 2. giving them the maximum amount of space possible without getting rid of all of their stuff :)

Here’s some pictures of when it was just Jaden’s room:


Photobucket

Photobucket

Photobucket

Photobucket

Photobucket

Then Jackson moved in and we changed it around more. Added a new bookshelf, put some vinyl up, rearranged toys, etc. Here’s the before bed:

beds

And here’s what we have now!

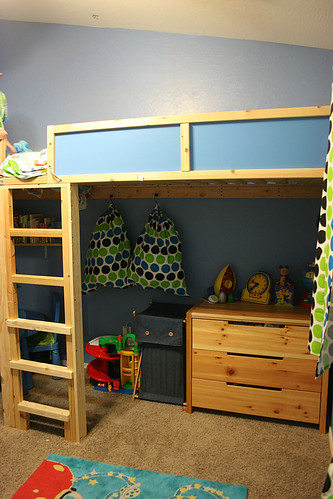
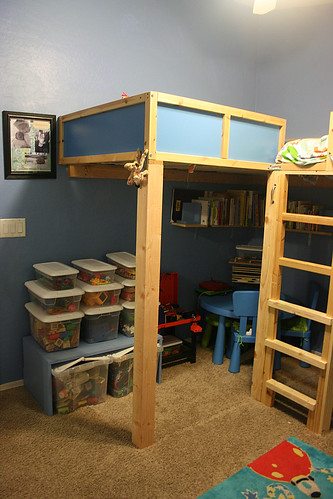
Micah took the bed Jaden used, and made it into two loft beds. He’s so talented, and they look so good. I was really concerned about them being up so high and having to climb up and down, but they are just monkey-ing it up! I have no worries now! I am seriously so proud of what Micah did with these beds. He’s a rock star.

Walking in: the whole right half is just play area. I ordered some fabric and made curtains, drawstring bags on hooks and then I am going to make some floor pillows with the same fabric that they can shove their stuffed animals in. Functional but comfortable to hang out on!

We got rid of the clouds, the vinyl quote and airplanes and the grass. That was a lot more work than you would think!

3

Jackson’s bed

2

Jaden’s bed

1

door area

4

room view from the mirror: (and the closet is all nice and organized again! yay! I have toy boxes in there that have smaller pieces that they have to ask to play with. and the dress up is in there too. we have a lock on it so that its more controlled. plus with the lock, no added laundry because of millions of clothing changes through the day.)

room

b a

And above each head, their names:

jackson name

jaden name

Added a square to the basketball hoop. This is Jackson’s favorite part of the room. I still need to put a logo in the square. I am thinking a fun “t”

hoops

Artwork wall so far:

art

The steps are a perfect place to pout…

pouting

or peek!

hangin out

or just hang out.

peeking out

monkey

Then we centered the fan above the rug so that no one gets knocked in the head. It changed up the lighting, but we added a light over their table under the bed, which balanced it all out.

We also added a chalkboard wall.

artists

Daddy has been enjoying it too!

dino

watching

They love it, we love it. Everything has a place. It’s easy to clean and spacious to play in. Everyone is happy!

train

goofball

dancing

dance with ellie